Sunday, July 29, 2012

Beams on


Everything folds nicely. The only adjustment is to shorten the hull supports on the trailer to allow the floats to fully fold. 


 Rear hatch has been sealed at last


Monday, June 18, 2012

Beam me up

The next major step has been achieved. The beams have been mounted into the floats & better still they fold as well. It is great to see the boat finally taking shape. They are not going all the way in as the lashing ropes holding the steady are in the way. Close inspection reveals that the will even miss the trailer mudguards. I just need to move the float bearers down a bit & I will get a nice tight fit. Geometry is great & they are easy to push in & out. Congrats Ian on a great design 


Beams mounted to floats

Saturday, March 31, 2012

Bar fridge


An important item but where to put it. I decided that it would best to access this from the cockpit. I used some 25mm blue foam. I cut each panel to fit & then glassed one side on the bench. I used a bit more epoxy as I wanted a good sealed finish
I then glued them in place & taped all the seams. The inner was made & fitted after the sheets were fitted to back of the compartment


I used my own self made hinges for the lid.

Saturday, February 25, 2012

Update Feb 2012

Well it has been a while since my last post. I must say that building in an undersized area at home is not good. Especially when a lot a lot of sanding is required. The dust is not good for neighbours, washing, cars etc.
I have finally found a vacant factory that I have been able to move the boat to which is 10 minutes from home. I moved at Xmas & since then have accomplished more than in the last 18 months. There is still a long way to go but I am able to focus on a lot more aspects of the boat & also spread myself out a bit.
I have installed a carbon fibre pulpit. I have also completed the hatch assembly & the hatch slide. The floats are just about finished fairing & I will spray the Hi build soon. The carbon chainplates are in the floats, although I had to cut out a temporary access hatch in the floats to get my hands in to laminate the glass.
The mast raising chainplates, carbon variety, are in. The ice box, beer fridge, with access from the cockpit is partially completed. Here are a few photos:

Here is the factory...big enough I think


Carbon Fibre pulpit started off with 2 pieces of electrical conduit & with a bit of help from the heat gun I managed to get the shape I wanted. I covered the tube with c/f sleave & then bogged & glassed them onto the hull. The rear ends were put through the hull & are bonded inside & outside the hull.


C/F mast raising chainplate is bonded through the hull

Saturday, April 10, 2010

Transom Bracket

Unfortunately work has been a bit slow on the boat...frustrating. Work & other bits & pieces have taken a lot of my spare time. At least I have been able to do a few things.

After much debate I decided that since I was making the daggerboard rudder & box that I would also alter the transom to suit. So I made the transom support bracket & cut a big hole in the cockpit floor.

This is the old set up.


I made up a false frame to fit the bracket to & taped this in place.


I made up some flat pieces of glass to act as flanges to sit the cockpit floor back on.

Because my cockpit flor sits a bit higher than plan I checked with Ian & he advised that I could leave out the support tubes if I used large fillets on the sides where it meets the floor. By the way I am not sure why the floor is higher. The person who I bought it off obviously had there reasons but I still don't like to deviate from plan. Unfortunately there is not much I can do here.


Floor sits a bit high at the moment but will trim to a flush fit & rebate edges to take the tape so that it will all sit flat.

Monday, November 23, 2009

Rudder Stock

Here is a description of how I went about making the rudder stock. To allow for the carpet on the inside of the case I started with packing tape on the board. Then I laid double sided tape over this.
I made a template & then cutout 3 layers of 1mm clear PVC. This was then double sided taped to the board. The last layer was a layer of thin mylar film.


I laid up the initial layers of carbon...4 layers at once is real messy!!!! I was not able to get a good vacuum so opted for just straight lay up. It was not as good as I would have hoped for but it all looked good.


Just a note to the ones who have not done this yet....make sure you mark the stock as top & bottom...otherwise you may just shape the bottom to the top profile. Luckily I left it a bit on the high side so I can still get a good shape....oops!!!

Also made a paper template for the spacer & glued that to the G10 tube. That is all for the moment. More to come.


Monday, June 29, 2009

Dagger Board Rudder Update

I have just started working on the rudder. My main concern was making sure that i got a profile that was true. When you have a high performance boat minor irregularities will tend to create problems at speed.
With that in mind i did a bit of research & found a person in Melbourne that can cut foam with a hot wire CNC cutter.
I gave him the dxf files that Ian gave me & here is the result.
The cutter was not able to shape the tip area but that can be done by hand. Overall i am very pleased with the result.
I think i will get him to do the dagger board as well. My attempts at shaping have left a little bit to be desired.

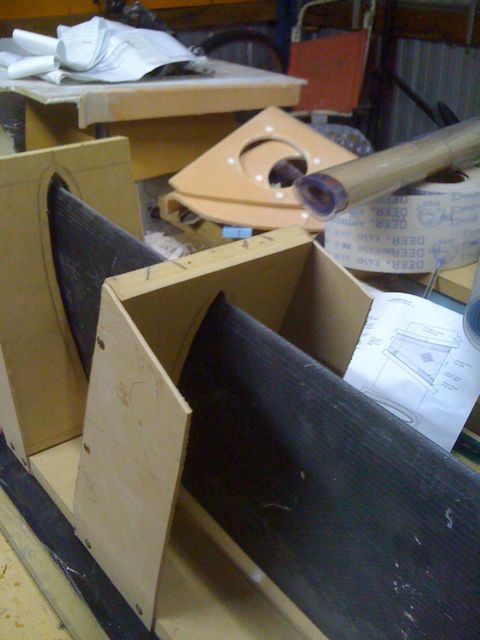
After much deliberation I decided that the best way to make the rudder was in 2 halves. By using the outer jacket as a mold & slicing the foil sections in half I can make the 2 halves & join them together.
The process that I have used is to mount the outer halves on 2 pieces of 25mm MDF board. I used a spray on contact adhesive for this


Once i had all 7 pieces down the next task was to create a mold for the tip. I did this by covering the foil section in tape & then making a mix of light auto body filler & then pushing the shaped tip section into the bog mix. After it had gone off I removed the tip section & cleaned up the filler.


Next step was to place a sheet of thin mylar film in the mold. I used the spray adhesive for this. I then taped the sides up with clear packing tape lapped over the edge of the mylar film to stop the epoxy from sticking to the foam. Next step was about 5 layers of mold release wax so that it will come out of the mold. I am hoping to make a 2nd spare rudder, just in case.


For the laminations I will only put the 1st layer of DB into the mold. The others will be placed over the complete blade once it is joined & removed from the mold. After the 1st DB layer I will then place the required layers of Uni followed by the other layers of DB for centre core support.
This then is vac bagged. Once done I started to fill in the rest of the internal parts with the shaped foil sections. I had to sand the shaped faces to allow for the laminates already laid down as I did not want to sand too much to get a flat half.
I also laid the balsa core. This was all laid in with a bog glue mix & then I used the vac bag to settle it into place.


This where I am up to at the moment. I am just about to start laying up the 2nd half today & then it will time to join them.